Bind a new domain directly from the project
Use this guide when you want to enter an apex root domain in KaisouMail /domains and let the project create the Cloudflare full zone on your behalf.
This is the flow we are using right now. Compared with “manually add the zone in Cloudflare and enable it in the project later”, it removes one manual handoff but requires more complete runtime permissions and configuration.
Prepare the feature before first use
1. Enable runtime domain management
The API Worker runtime must have:
EMAIL_ROUTING_MANAGEMENT_ENABLED=trueCLOUDFLARE_RUNTIME_API_TOKEN(or the sharedCLOUDFLARE_API_TOKEN)EMAIL_WORKER_NAME
Where:
EMAIL_ROUTING_MANAGEMENT_ENABLED=trueallows the project to read and mutate Cloudflare domain and Email Routing stateEMAIL_WORKER_NAMEdetermines which Worker future mailbox routing rules target- The same runtime configuration is reused by the domain-level Catch All toggle; no extra secret names are introduced
2. Configure the Cloudflare token and scope
Project-direct binding adds one extra step compared with enabling an existing zone: creating the zone.
Use the full runtime minimum in Cloudflare Token Permissions, and make sure the token scope covers the intended Cloudflare account and zone set.
3. Configure CLOUDFLARE_ACCOUNT_ID
Direct bind also requires the GitHub repository secret:
CLOUDFLARE_ACCOUNT_ID
The deploy workflow injects it into the API Worker runtime. Without it, the project may have a valid token but still not know which Cloudflare account should own the new zone.
4. Verify the entry point is open after deploy
After deploy, confirm:
GET /api/metareturnscloudflareDomainLifecycleEnabled=trueGET /api/metareturnscloudflareDomainBindingEnabled=true/domainsshows the Bind mailbox domain form
If the second value is still false, check whether CLOUDFLARE_ACCOUNT_ID actually reached Worker runtime instead of existing only in the GitHub Actions job environment.
Use the feature to bind a new domain
Step 1: enter the apex root domain in /domains
Open /domains in the control plane and locate the Bind new domain card:
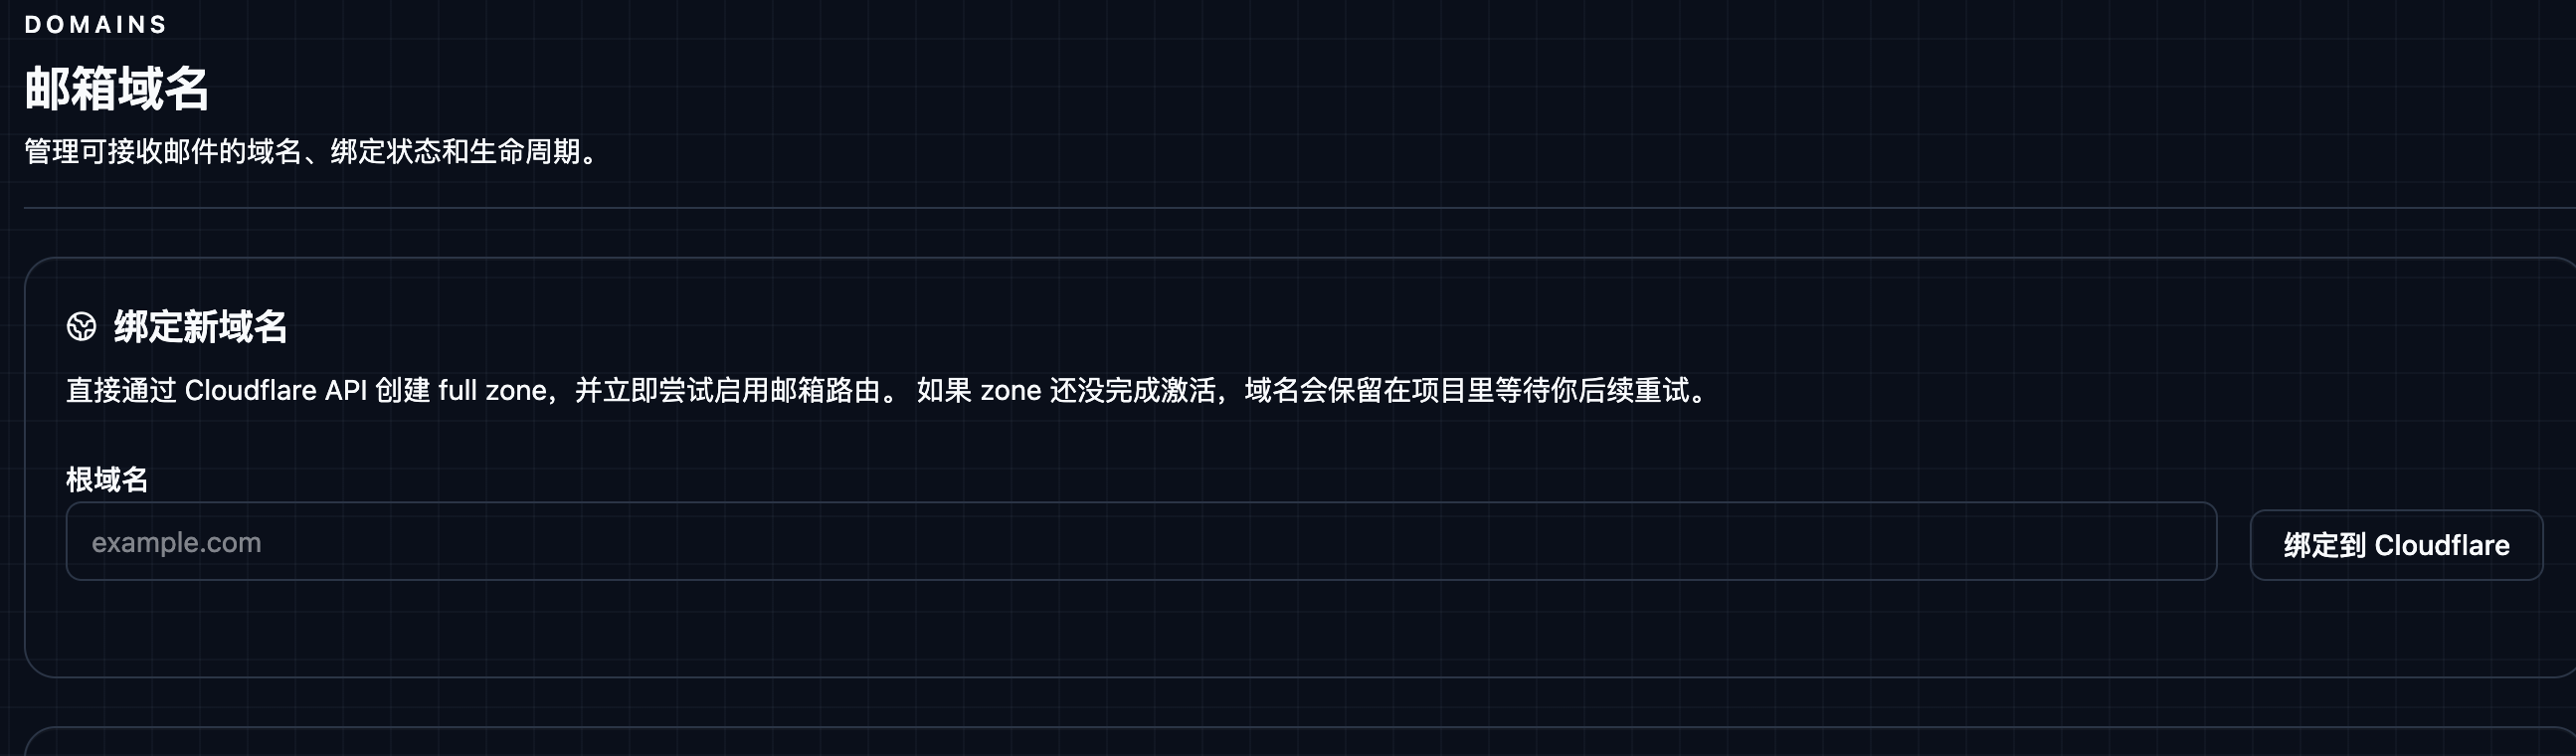
/api/domains/bind is apex-only
If you want addresses such as user@mail.customer.com, do not submit
mail.customer.com directly to /api/domains/bind. The recommended path is:
- bind the apex first:
customer.com - create the mailbox with
subdomain=mail - the final address still becomes
user@mail.customer.com
If Cloudflare already has a zone, you can use the
/domains catalog enable flow instead, but the
product does not treat child-zone onboarding as a standard free-tier path.
Step 2: submit the bind request
After you click Bind to Cloudflare, the project calls POST /api/domains/bind and then performs:
- Cloudflare
POST /zones - Cloudflare
GET /zones/:zone_id - Cloudflare
POST /zones/:zone_id/email/routing/enable
Step 3: if the page does not go straight to active, update the apex authoritative nameservers first
You usually land in one of these states:
active: delegation is already satisfied and the domain can be used for new mailboxes immediately.provisioning_error/pending: the zone already exists, but activation is not finished yet. At this point you must update nameservers at the domain registrar before doing anything else.
When the domain is retained in provisioning_error, the row stays visible in the domain catalog like this:

At that point, click the details icon in the action column for the same row and read the zone plus the Cloudflare-assigned nameservers from the dialog:
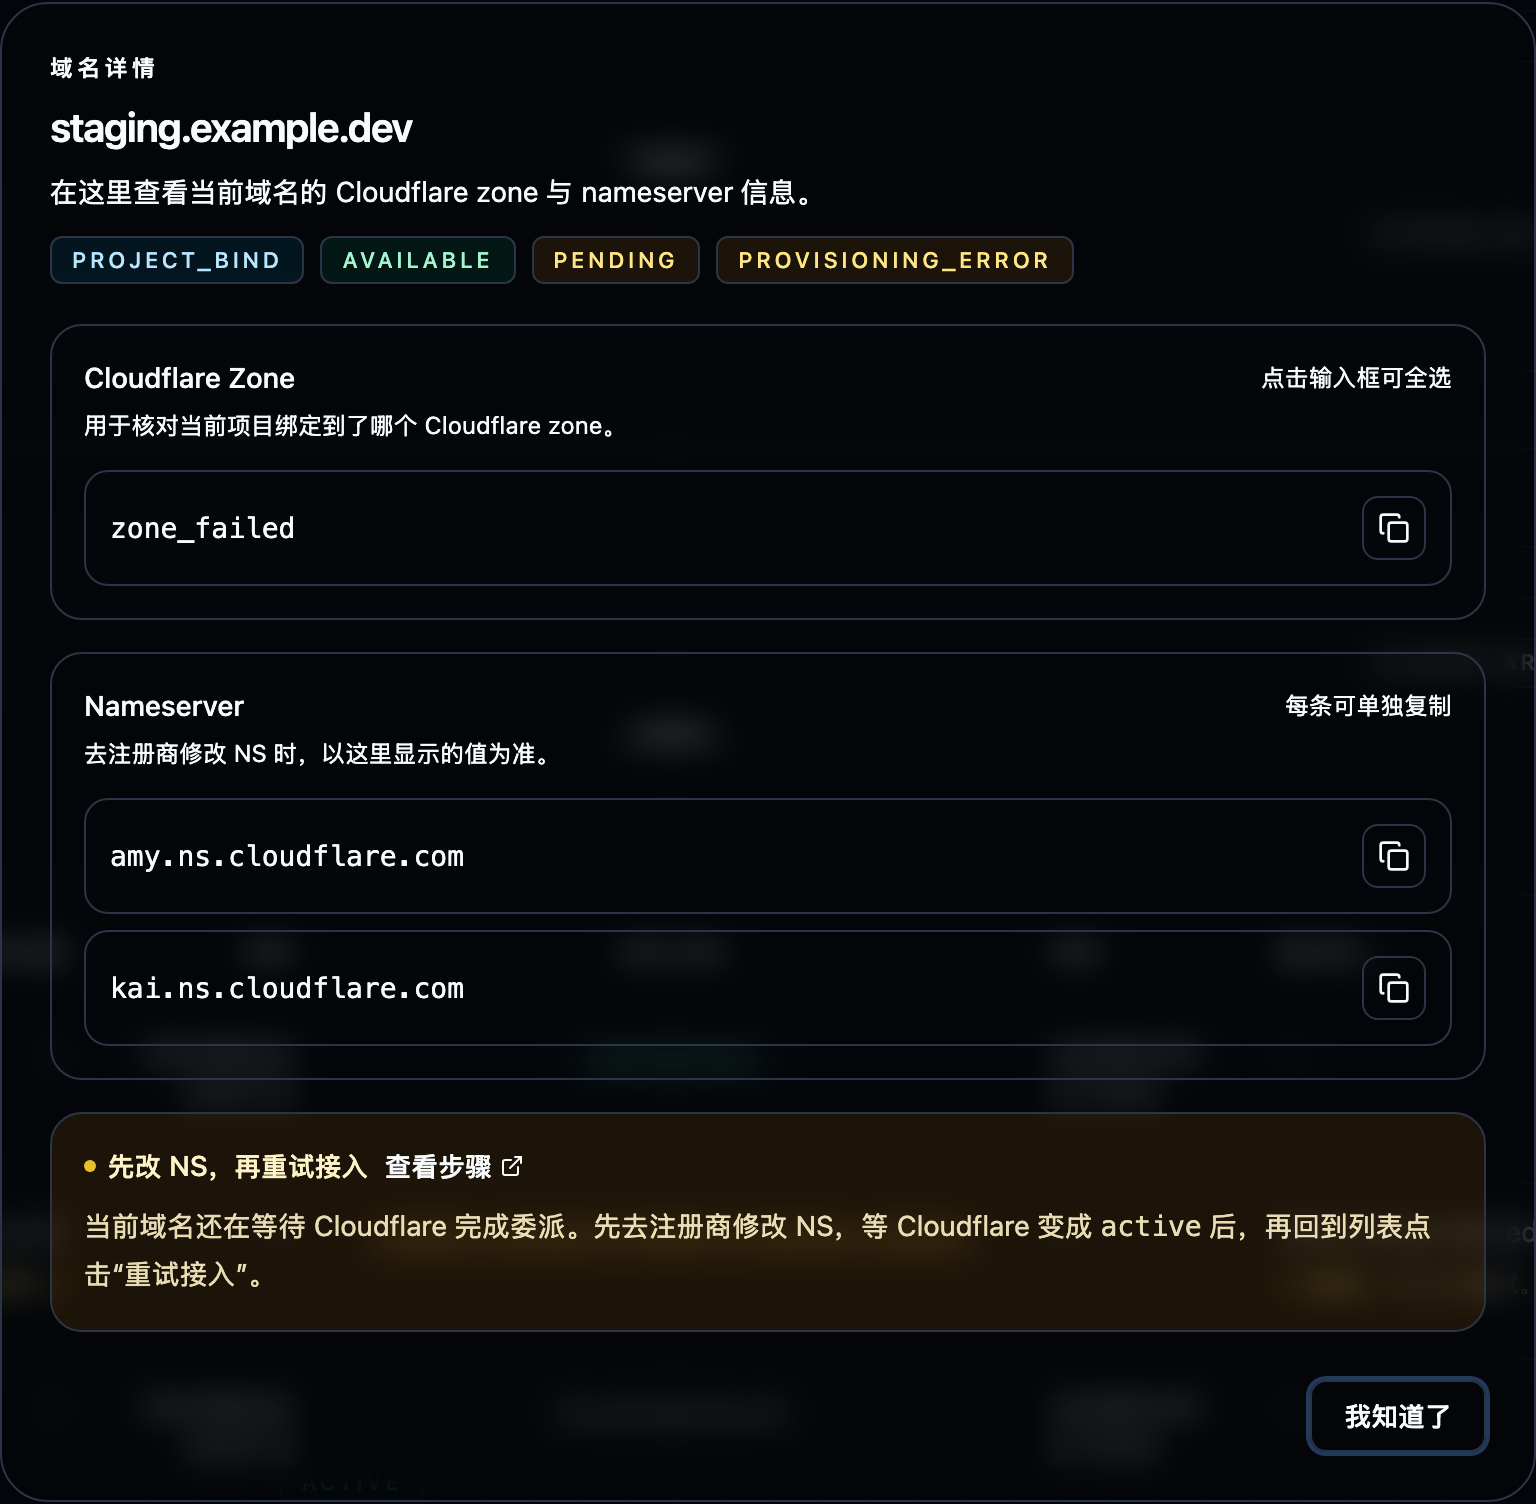
Then copy the nameservers from that dialog into your registrar exactly as shown.
In other words: the project creates the zone, but it does not update registrar NS records for you. That step is always manual.
Step 4: wait for zone activation, then return to /domains and retry
After updating nameservers:
- wait until the zone changes from
pendingtoactivein Cloudflare - return to
/domains - click Retry for that row
- confirm the project status becomes
active
If the apex authoritative nameservers are still not switched, repeatedly clicking Retry usually will not help.
Use the domain after binding
Once the domain becomes active:
- the Web mailbox form can select it directly
POST /api/mailboxesandPOST /api/mailboxes/ensurecan target it withrootDomain- if mailbox creation omits
rootDomain, the server randomly selects from allactivedomains GET /api/metaincludes it in the current active root-domain list
If you also enable Catch All for that domain from /domains:
- mail sent to unregistered addresses is still delivered to the mail Worker
- KaisouMail auto-materializes those addresses as long-lived
Catch Allmailboxes - disabling Catch All restores the previous Cloudflare catch-all rule that was present before the project took control
If you temporarily do not want new mailboxes to land on that domain, disable it in /domains. Disable stops new allocations, but it does not automatically delete historical routing rules.
Troubleshooting
Recommended order: check permissions and runtime config first, then inspect zone activation state, then inspect Email Routing write permissions.
Missing com.cloudflare.api.account.zone.create permission
Typical message:
Requires permission "com.cloudflare.api.account.zone.create" to create zones for the selected account
In the UI, it usually appears as a short inline prompt like this:

This means the runtime token cannot create a new Cloudflare zone, so the bind flow fails on the first Cloudflare call.
Fix steps:
- verify the expected token is present in Worker runtime
- verify the token belongs to the intended Cloudflare account
- add the required zone-management permissions described in Cloudflare Token Permissions
- redeploy the Worker
- retry from
/domains
Missing Cloudflare permissions required for the bind flow
Typical messages:
permission deniedforbiddenunauthorizedRequires permission ...
If the failure is permission-related but not explicitly zone.create, the token usually lacks one of the required capabilities in the bind path, such as:
- creating zones
- reading zones
- validating zone access
- enabling Email Routing
Fix steps:
- compare the runtime token with the minimum set in Cloudflare Token Permissions
- confirm the token scope covers the intended Cloudflare account and zone
- redeploy and retry binding
Missing CLOUDFLARE_ACCOUNT_ID
Typical message:
Cloudflare domain binding requires CLOUDFLARE_ACCOUNT_ID to be configured
This is not a token-permission issue. Runtime is missing the account id, so the Worker does not know where the new zone should be created.
Fix steps:
- add
CLOUDFLARE_ACCOUNT_IDto repository secrets - confirm the deploy workflow injects it into API Worker runtime
- redeploy
- confirm
GET /api/metareturnscloudflareDomainBindingEnabled=true - retry from
/domains
The zone is still pending or nameservers are not delegated yet
Typical messages:
Zone is pending activation- or any message mentioning
pending,activation,nameserver, ordelegated
This means Cloudflare accepted the apex zone creation request, but authoritative nameserver switching is not complete yet, so Email Routing cannot be enabled.
In the UI, this usually appears as a retained row with provisioning_error, plus a details icon and Retry in the action column:
This is the most common recoverable failure in the project-direct flow:
- the zone stays in the project
- the local record usually shows
provisioning_error - once delegation is complete, you can click Retry in
/domains
Fix steps:
- check whether the zone is still
pendingin Cloudflare - click the details icon for that row and update the apex registrar / DNS provider nameservers to the exact Cloudflare values shown in the dialog
- wait until the zone becomes
active - return to
/domainsand click Retry
Missing Email Routing runtime config
Typical messages:
Email Routing management is enabled but EMAIL_WORKER_NAME is not configuredEmail Routing management is enabled but CLOUDFLARE_RUNTIME_API_TOKEN or CLOUDFLARE_API_TOKEN is not configured
This is not a Cloudflare ACL problem. Worker runtime is missing configuration required by the bind flow.
Fix steps:
- verify runtime injects:
CLOUDFLARE_RUNTIME_API_TOKENorCLOUDFLARE_API_TOKENEMAIL_WORKER_NAME
- confirm the deploy workflow passes those values into the API Worker
- redeploy the Worker
- retry from
/domains
Email Routing enablement authentication or permission failure
Typical messages:
Authentication error- the zone can be created or read, but Email Routing enablement fails
This usually means the token:
- can access the zone but cannot edit zone settings
- or can access the zone but cannot write Email Routing rules
- or does not scope over the target zone
Fix steps:
- confirm the token includes:
Zone: Zone: EditZone: Email Routing Rules: EditZone: Zone Settings: Edit
- confirm the token scope covers the target zone
- if it still fails, inspect the exact Cloudflare response in Worker logs
Still cannot identify the failure
If the error does not fit the categories above, keep checking in this order:
- read the original control-plane error kept in the UI
- inspect the Cloudflare API response in Worker logs
- confirm token,
CLOUDFLARE_ACCOUNT_ID, andEMAIL_WORKER_NAMEare all configured - confirm the target domain does not already conflict with another existing zone
- confirm you are operating in the intended Cloudflare account